📖 Getting Started Guide

Welcome to CertiLink!

Follow this visual guide with real screenshots of the website to find your barangay, register an account, and log in. Click any screenshot to zoom in!

This is the very first step every time you visit CertiLink. You must select your barangay location before you can register or log in. Each step below has a real screenshot — click any image to zoom in!
CertiLink Homepage Zoom
1
Step 1 of 8 — Homepage
Click "Find My Barangay" to Get Started

When you open the CertiLink website, you will see the homepage. On the right side there is a white card that says "Get Started".

Look for the button that says 🔍 "Find My Barangay" and click it to begin selecting your barangay location.

The red arrow in the screenshot is pointing to the "Find My Barangay" button — that is exactly what you need to click!
Select Island Zoom
2
Step 2 of 8 — Island
Select Your Island

After clicking "Find My Barangay", a form appears. The first dropdown asks you to choose your Island. Click the Island dropdown and pick from the 3 major islands:

Luzon — if your barangay is in Luzon
Visayas — if your barangay is in Visayas
Mindanao — if your barangay is in Mindanao
Once you select an island, the Region dropdown will automatically unlock and become available to select.
Select Region Zoom
3
Step 3 of 8 — Region
Select Your Region

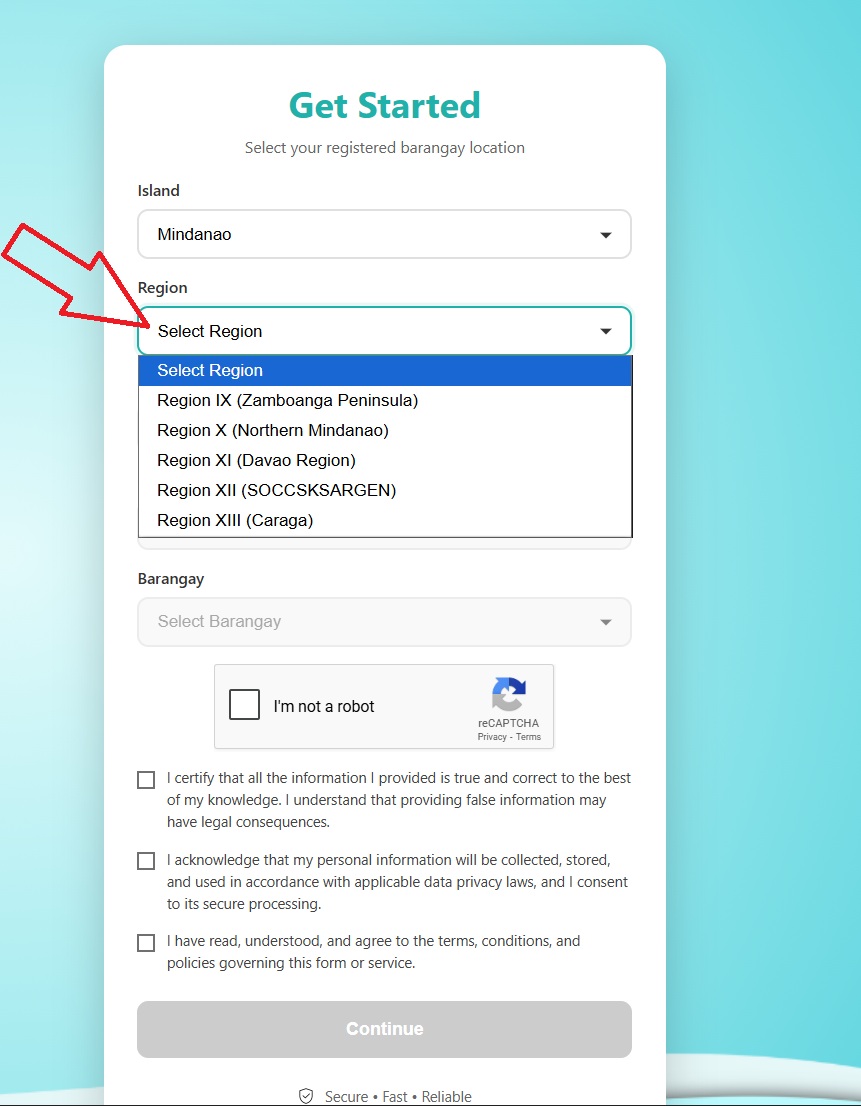
After selecting your island, the Region dropdown will unlock. Click it and choose the region where your barangay is located.

The screenshot shows the Mindanao regions as example — you can see Region IX, Region X, Region XI, Region XII, Region XIII, and BARMM. Only regions that belong to your selected island will appear.

After selecting your region, the Province dropdown will unlock next.
Select Province Zoom
4
Step 4 of 8 — Province
Select Your Province

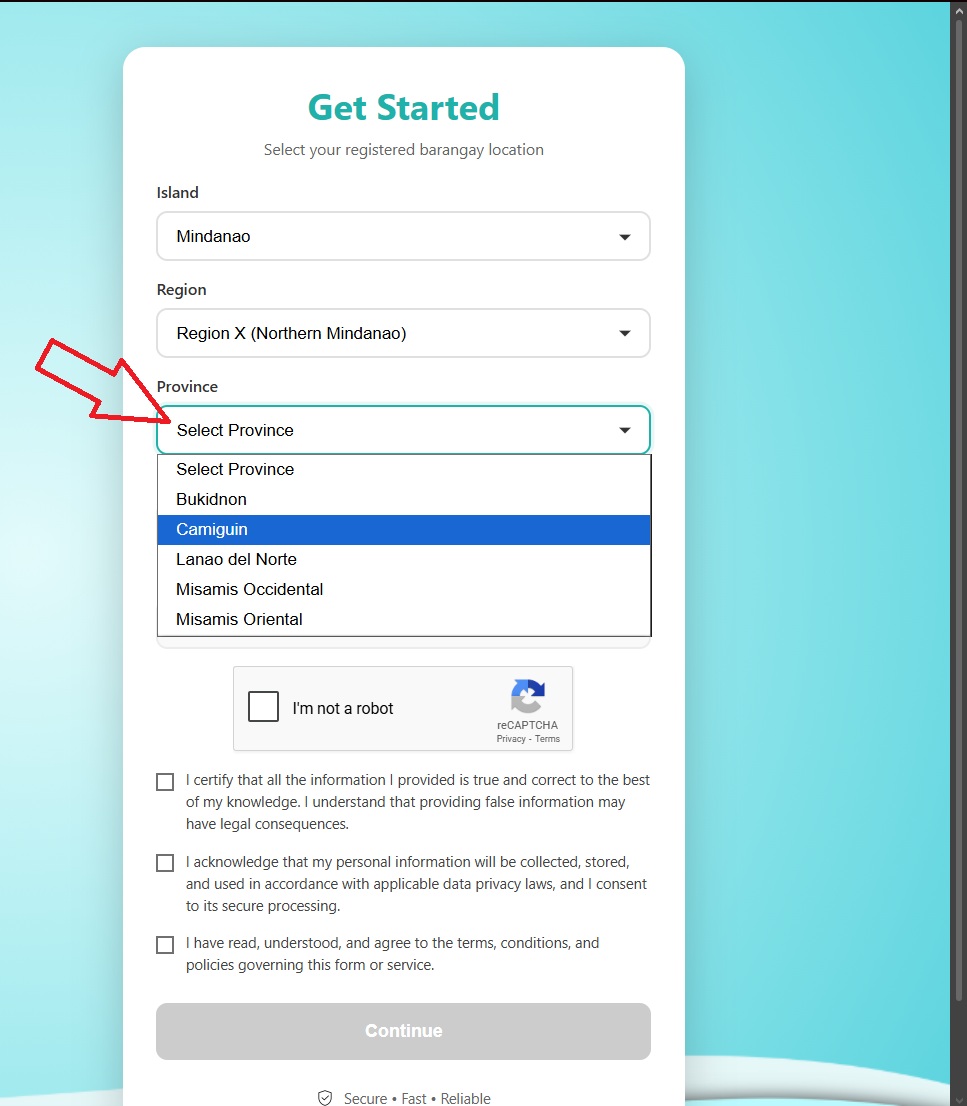
After selecting your region, the Province dropdown unlocks. Click it and choose the province where your barangay belongs.

For example, if you selected Region X (Northern Mindanao), you will see provinces like Bukidnon, Camiguin, Lanao del Norte, Misamis Occidental, and Misamis Oriental.

After selecting your province, the City / Municipality dropdown will unlock next.
Select City/Municipality Zoom
5
Step 5 of 8 — City / Municipality
Select Your City or Municipality

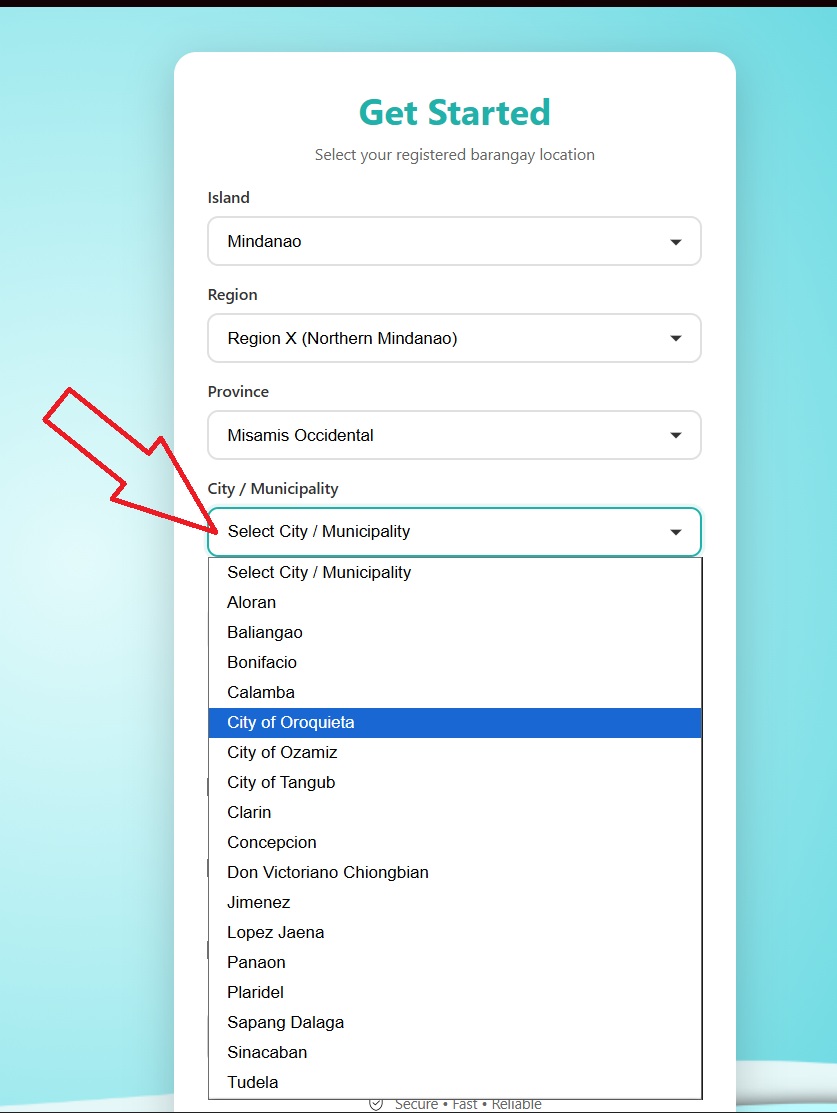
After selecting your province, click the City / Municipality dropdown and find the city or municipality where your barangay is located.

The screenshot shows the list of cities and municipalities under Misamis Occidental as an example. Scroll through the list to find yours.

After selecting your city or municipality, the Barangay dropdown will unlock as the final location step.
Select Barangay Zoom
6
Step 6 of 8 — Barangay
Select Your Barangay

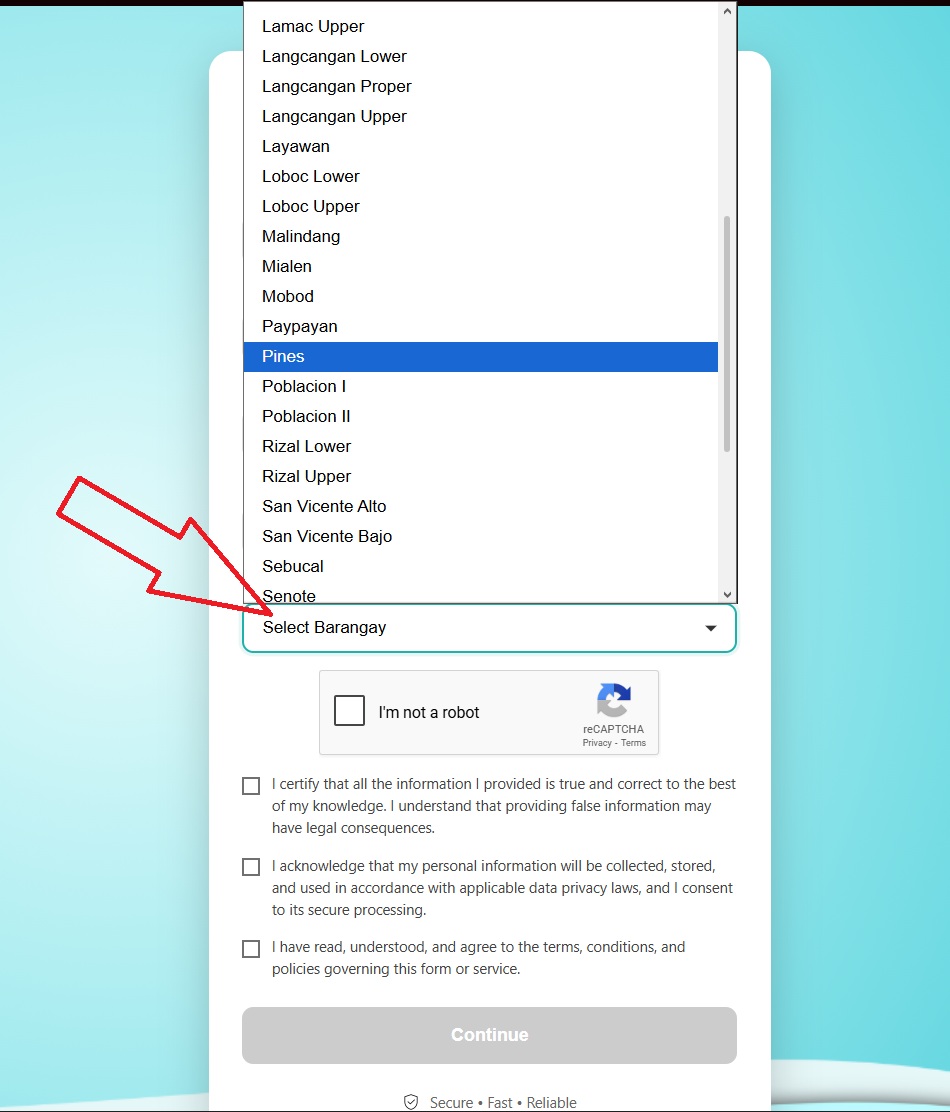
This is the last location dropdown. Click the Barangay dropdown and scroll through the list to find and select your specific barangay.

The screenshot shows the barangay list as an example — Barangay Pines is highlighted. Select the barangay that matches your registered home address.

Your barangay must be officially registered and approved in the CertiLink system. If your barangay is not in the list or shows an error, contact your barangay administrator to register.
reCAPTCHA and Terms Zoom
7
Step 7 of 8 — Verification & Terms
Complete reCAPTCHA & Tick All 3 Terms

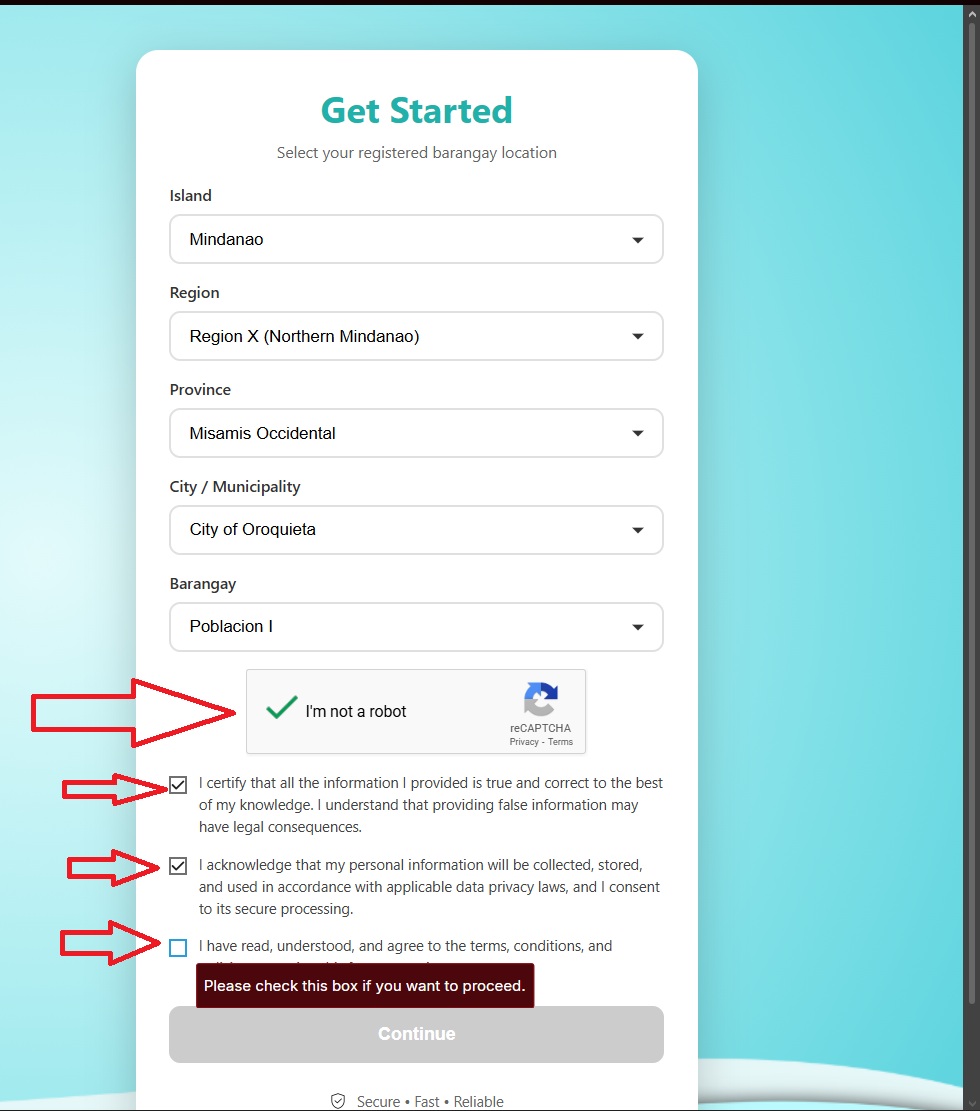
After selecting all 5 location dropdowns, complete these two required actions before you can click Continue:

reCAPTCHA: Click the "I'm not a robot" checkbox. A green checkmark ✅ will appear when passed — this proves you are a real person.
☑️
Checkbox 1: I certify that all information I provided is true and correct. I understand providing false info may have legal consequences.
☑️
Checkbox 2: I acknowledge my personal information will be collected and stored safely under data privacy laws.
☑️
Checkbox 3: I have read and agree to the terms, conditions, and policies of this service.
The "Continue" button stays grey and disabled until all 3 checkboxes are ticked AND the reCAPTCHA is completed. You must finish all of them!
Success Green Message Zoom
8
Step 8 of 8 — Success!
Green Message = Your Barangay is Registered!

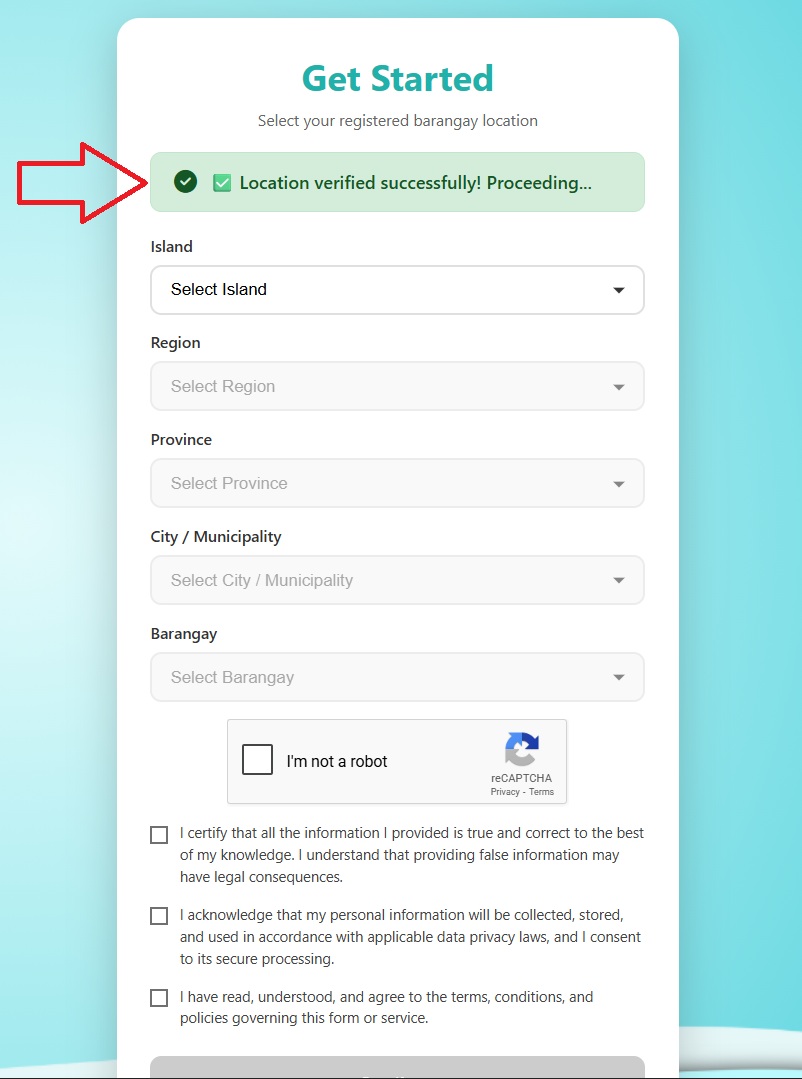
After clicking Continue, if everything is correct, you will see a green message at the top of the form that says:

✅ "Location verified successfully! Proceeding..."

This green message confirms your barangay is officially registered in the CertiLink system. The page will then automatically redirect you to the Login page.

If you see a red error message instead of green, it means your barangay is not yet registered in our system. Please contact your barangay administrator to register it.
🗺️

Barangay Location Selected!

You have completed all 8 steps for selecting your barangay. The system will redirect you to the Login page. If you don't have an account yet, click below to learn how to Register!

After your barangay location is verified, you will be taken to the Resident Verification System. This step confirms that you are a real registered resident of that barangay before you can create an account.
Resident Verification Form Zoom
1
Step 1 of 4 — Verification Form
Fill In Your Basic Information

You will see the CertiLink Resident Verification System form. Fill in all the required fields. Important: The information you enter here must be the exact same information that your barangay has on record for you.

⚠️ Your details must match your barangay records! If your name, birthdate, or contact number is different from what is registered in your barangay, the verification will fail.
2
Step 2 of 4 — Fill Each Field
What to Enter in Each Field

Here is a guide for each field in the verification form:

First Name
Your legal first name as registered in barangay records
Middle Name
Your middle name — type NONE if you have no middle name
Last Name
Your family surname as registered in your barangay
Ext. Name
Extension name like Jr., Sr., III — type NONE if not applicable
Birth Date
Your exact date of birth — must match barangay records
Civil Status
Single, Married, Widowed, or Separated
Contact Number
Your 11-digit PH mobile number registered with barangay
6 Digit OTP
One-Time Password sent to your registered contact number
All information must be exactly the same as what your barangay has registered for you. Even a small difference (like a typo in your name or wrong birthdate) will cause the verification to fail.
3
Step 3 of 4 — OTP Verification
Enter the 6-Digit OTP and Click "Verify OTP"
After filling your contact number, an OTP (One-Time Password) will be sent to your registered mobile number via SMS.
Type the 6-digit OTP code you received into the OTP field.
Click the "Verify OTP" button to confirm your phone number is correct.
OTP codes expire quickly — use it within a few minutes. If it expires, request a new one.
Make sure your contact number is the same number registered in your barangay records. The OTP will only be sent to that number — if it is different, the verification will fail.
4
Step 4 of 5 — Submit
Click the "Verify" Button

Once all fields are filled and OTP is verified, click the big green "Verify" button at the bottom of the form. The system will check your details against your barangay's records.

If successful: A dark popup alert will appear on your screen confirming your identity — see Step 5 below!
If failed: An error will appear. Double-check that all your details exactly match what is in your barangay's records and try again.
5
Step 5 of 5 — Success!
You Will Receive a Success Alert — Click "OK"!

Once the system detects that you are registered in the barangay, a dark popup alert will automatically appear on your screen saying:

This popup confirms your barangay has recognized and verified your identity successfully.
Click the "OK" button on the popup — you will then be automatically redirected to your Dashboard to start requesting certificates!
If you do NOT see this success popup after clicking Verify, it means your details did not match the barangay records. Go back and carefully check each field you entered.

Resident Verified!

Your identity has been confirmed by your barangay. Click OK on the popup and you will be taken to your Dashboard. If you are new, proceed to Register your account next!

If this is your first time using CertiLink, you need to create a free account. Registration only takes a few minutes and your details will be auto-filled in future forms!
1
Step 1 — Login Page
Find and Click the "Register" Link

After your barangay is verified and you land on the Login page, look for the link that says "Don't have an account? Register" or "Sign Up" and click it to open the registration form.

2
Step 2 — Registration Form
Fill In All Your Personal Information

Complete the registration form with your correct and accurate personal details. Fields with a red dot are required — do not leave them blank.

Full Name
Your complete legal name
Email Address
For login & notifications
Password
At least 8 characters
Contact Number
11-digit PH mobile
Home Address
Your complete address
Date of Birth
Day / Month / Year
Gender
Male / Female / Other
Barangay
Auto-set from your selection
Your name and address will be auto-filled in certificate request forms later — so make sure they are accurate!
3
Step 3 — Password Tips
Create a Strong Password
Use at least 8 characters or more
Mix uppercase and lowercase letters (e.g., JuanDoe)
Add numbers and symbols (e.g., Juan@2024)
Do NOT use your name or birthday as your password
4
Step 4 — Submit
Review and Click "Register"

Double-check everything, then click the "Register" or "Sign Up" button. After successful registration, you will be automatically logged in and taken to your Dashboard to start requesting certificates!

Use a real, working email address. Certificate updates and notifications will be sent there. Never share your password with anyone.
🎉

Account Registered!

Your CertiLink account is ready. Next time you visit, just use your email and password to log in. Learn how in the next tab.

Already have a CertiLink account? Here's how to sign in every time you want to access your dashboard and certificates.
1
Step 1 — Every Visit
Always Select Your Barangay First

Every time you open CertiLink, you must select your barangay location first — even if you have logged in before. Go to the homepage → click "Find My Barangay" → select your location → complete reCAPTCHA → tick all terms → click "Continue".

2
Step 2 — Email
Enter Your Registered Email Address

On the Login page, type the email address you used when you created your CertiLink account. Make sure there are no extra spaces before or after the email.

3
Step 3 — Password
Enter Your Password and Click "Login"

Type your password carefully. Passwords are case-sensitive — make sure CAPS LOCK is off. Click the 👁 eye icon to show/hide your password as you type. Then click the "Login" button to sign in and be taken to your Dashboard.

4
Step 4 — Forgot Password?
How to Reset Your Password

If you forgot your password, click the "Forgot Password?" link on the login page then follow these steps:

Enter your registered email address
Check your email inbox for the reset link (also check Spam/Junk folder)
Click the link and set a new password
Return to login and sign in with your new password
Passwords are CASE-SENSITIVE. If your login fails, check your CAPS LOCK key. If still unable to log in, use "Forgot Password?" to reset it.

You're Logged In!

You are now inside CertiLink! Learn how to use your Dashboard to request certificates, track your submissions, and download your documents.

Welcome to your CertiLink Dashboard! This is where you can request certificates, track your applications, make payments, and download your documents — all in one place.
CertiLink Dashboard Overview Zoom
1
Step 1 of 6 — Dashboard Overview
Explore Your Dashboard

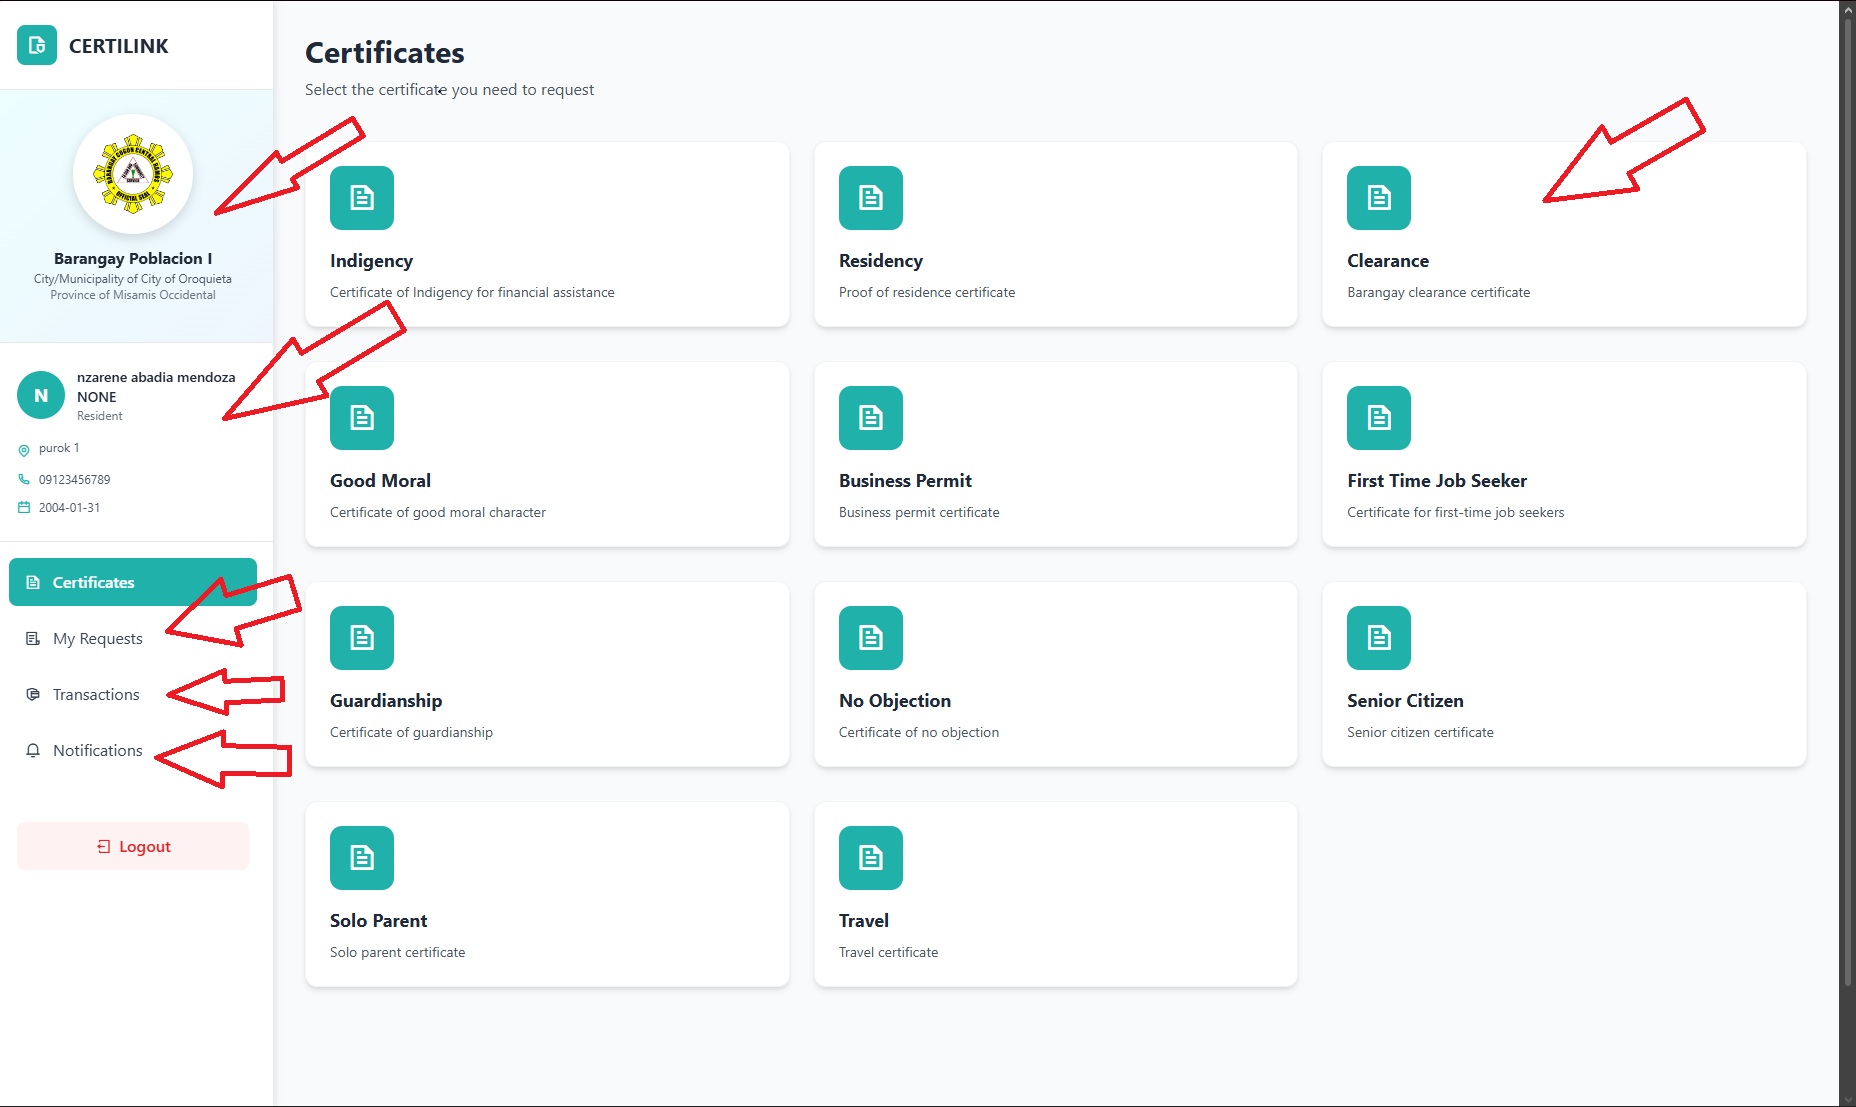
After logging in, you will land on your Dashboard. Here is a quick overview of everything you can see and do:

Certificates Section (Main Area) — Shows all available certificates you can apply for, such as Barangay Clearance, Indigency, Residency, Good Moral, Business Permit, Travel, and more. Simply click the certificate you need to begin.
Sidebar — Your Profile & Barangay Info — On the left side, you will see your barangay logo and name, your full name, your purok/address, contact number, and date of birth.
My Requests — View all the certificates you have submitted and check their current status (Pending or Sent to Admin).
Transactions — View your complete payment history for all certificates you have paid and downloaded.
Notifications — Stay updated with the latest announcements and important updates from your barangay.
Fill up certificate form Zoom
2
Step 2 of 6 — Certificate Application Form
Fill Up the Certificate Form

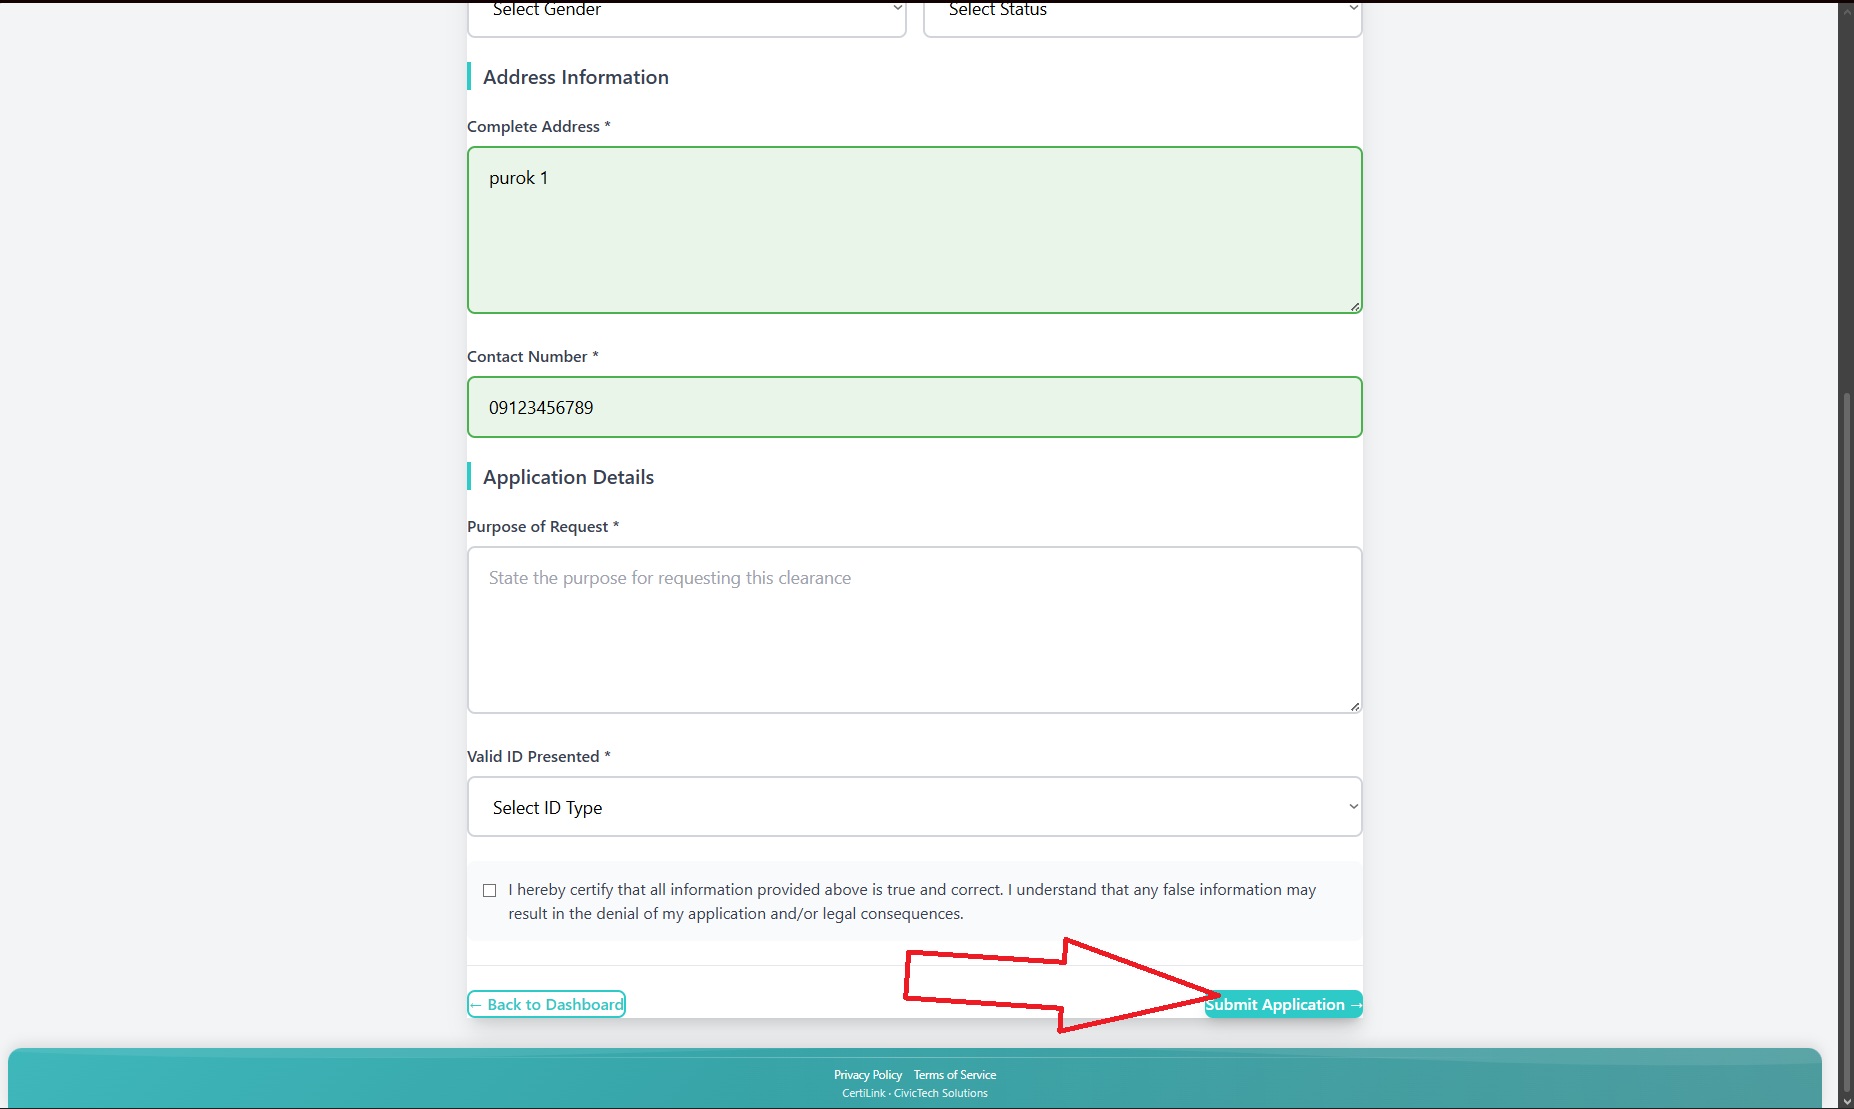
After clicking a certificate type, the application form will open. Your personal details (name, address, contact number) are automatically filled in based on your registered information — saving you time!

Review the auto-filled fields — Make sure your name, address, and contact number are correct. You may edit any field if needed.
Fill in the remaining fields — Some fields like Purpose of Request and Valid ID Presented need to be filled in manually depending on the type of certificate.
Check the certification box — Tick the checkbox confirming that all information you provided is true and correct.
Click "Submit Application" — Once everything is complete, click the teal "Submit Application →" button at the bottom right to send your request.
Generated certificate preview Zoom
3
Step 3 of 6 — Certificate Preview
Review Your Generated Certificate

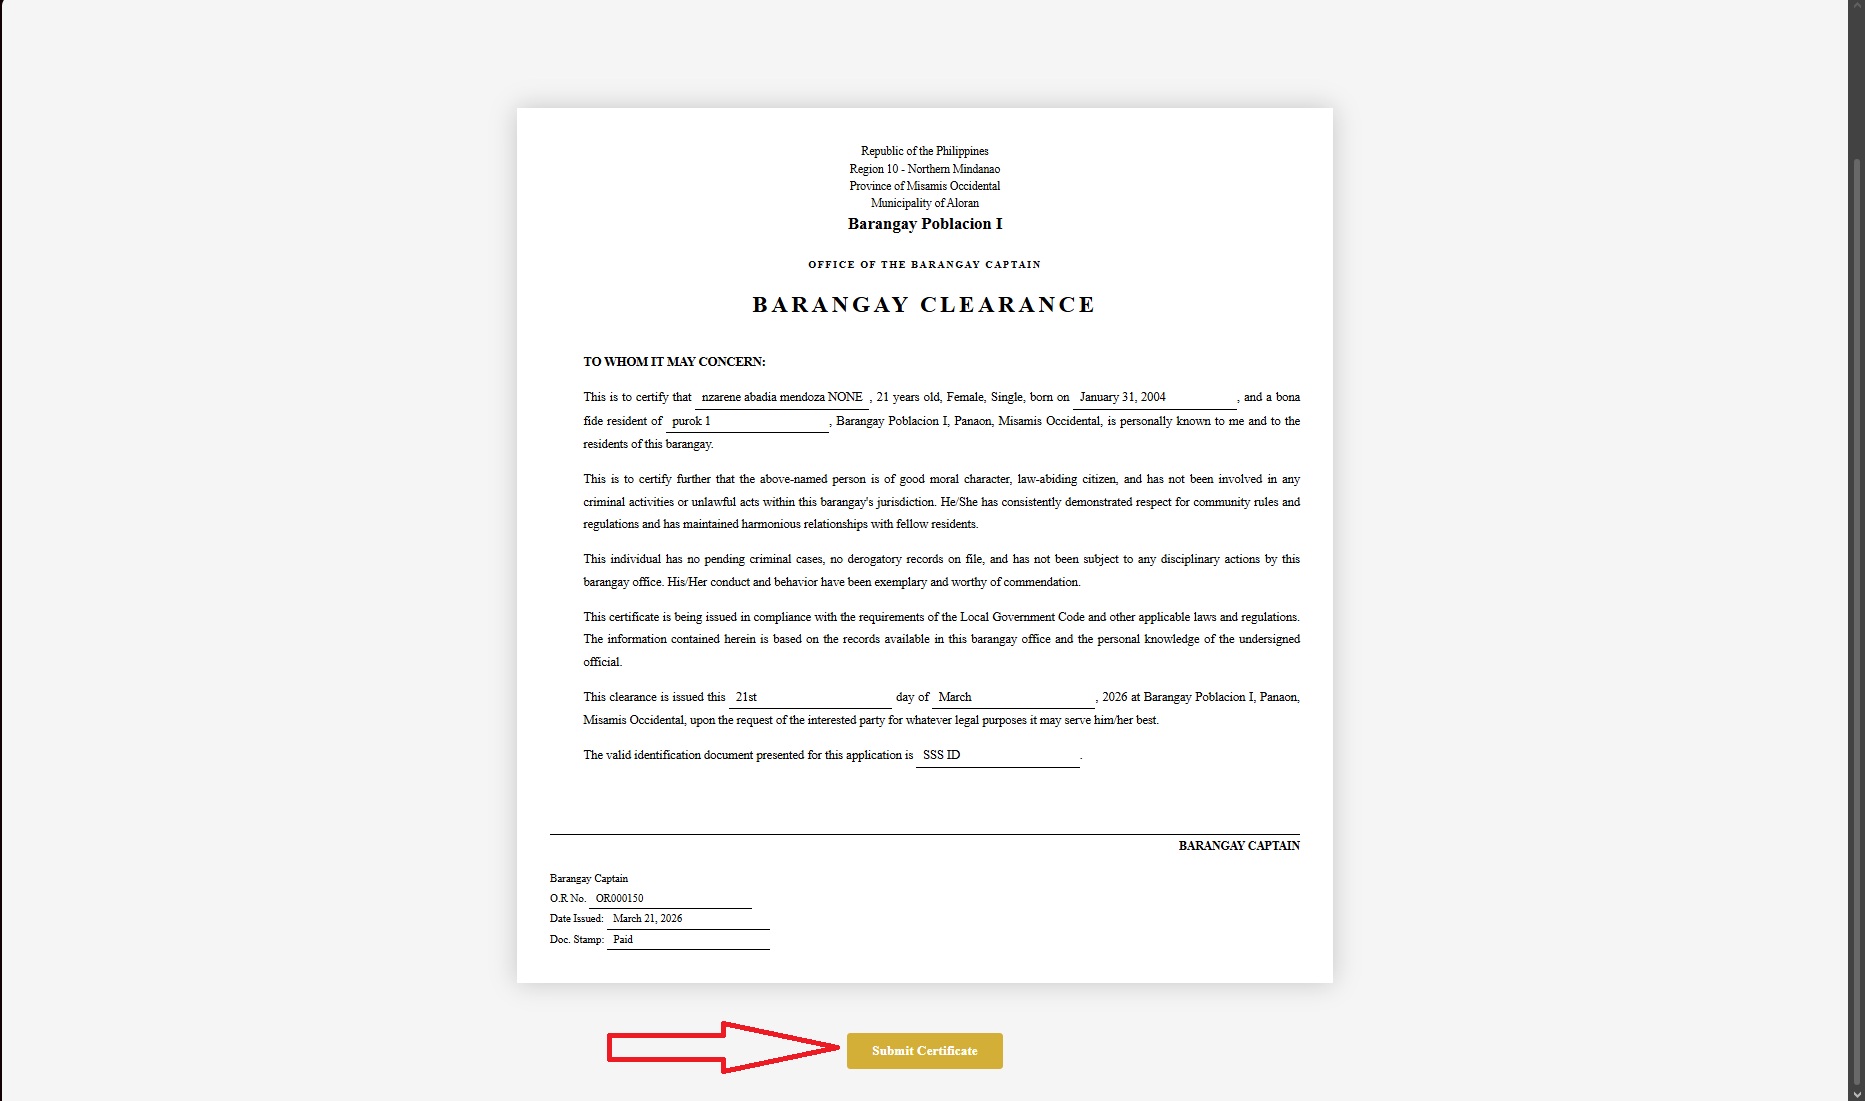
After submitting the form, the system generates an official certificate using the information you provided. You will see the actual certificate document on your screen — complete with your name, address, date of birth, and all other relevant details filled in.

Read through the certificate — Carefully check that all the information shown is correct before proceeding.
Click "Submit Certificate" — Once you have reviewed and confirmed the certificate content, click the gold "Submit Certificate" button at the bottom to officially send it for processing.
Once submitted, your certificate will appear in My Requests where you can track its status, download it, or send it to the admin.
My Submitted Certificates Zoom
4
Step 4 of 6 — My Requests
Track Your Submitted Certificates

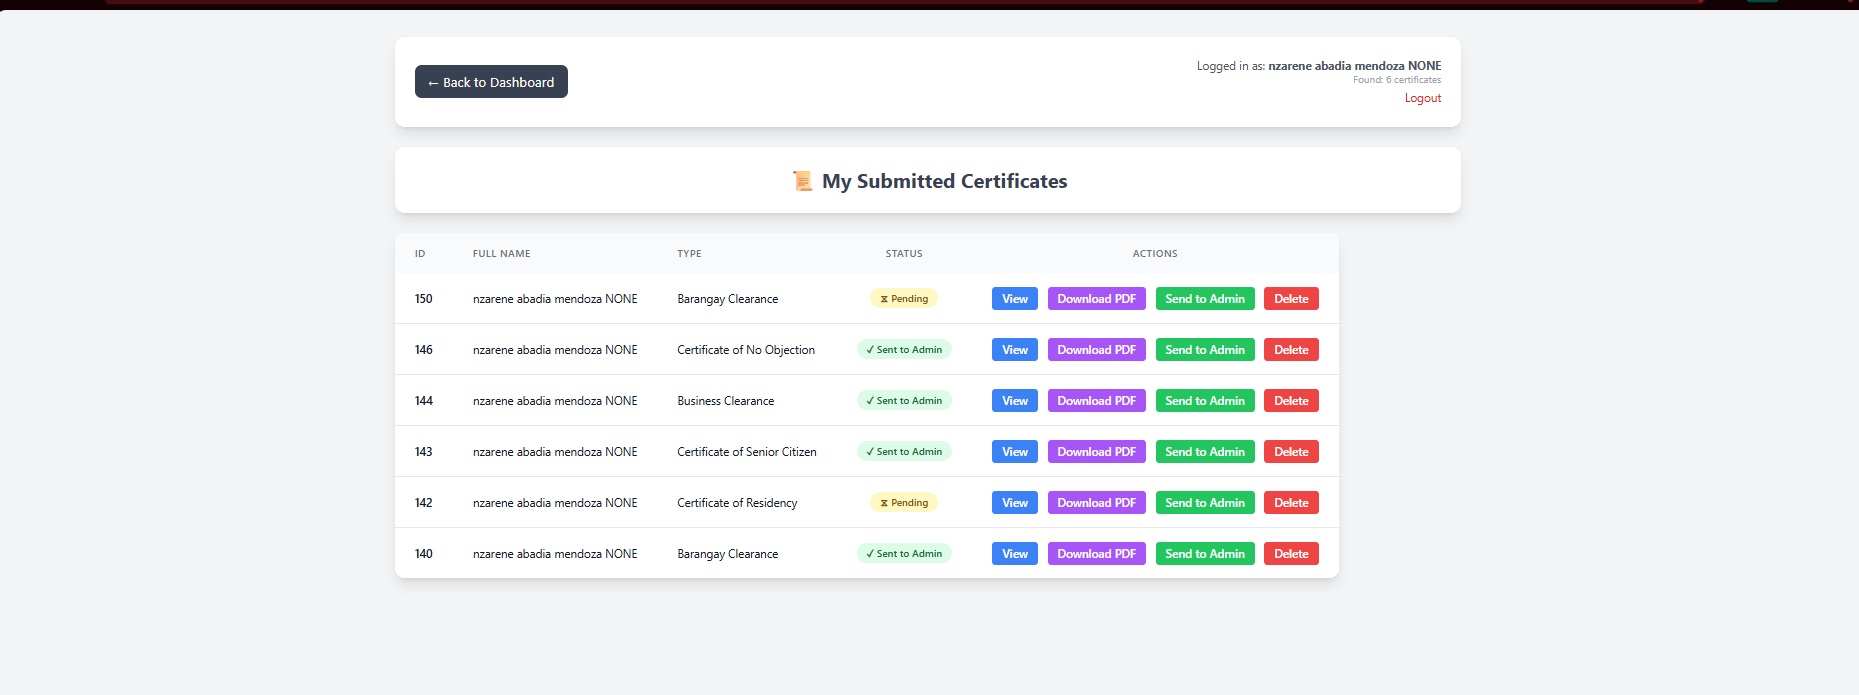
In the "My Requests" section, you can see all the certificates you have submitted along with their current status. Each certificate entry has several action buttons:

VIEW
View — Opens and displays your certificate document so you can read the full content.
PDF
Download PDF — Downloads your certificate as a PDF file. Note: A small processing fee payment is required before downloading.
ADM
Send to Admin — Forwards your certificate directly to the barangay secretary/admin for official signing and processing.
DEL
Delete — Permanently removes the certificate request from your list if you no longer need it.
The status column shows either ⏳ Pending (still being processed) or ✅ Sent to Admin (already forwarded to the barangay office).
Payment Required popup Zoom
5
Step 5 of 6 — Payment
Pay to Download Your Certificate

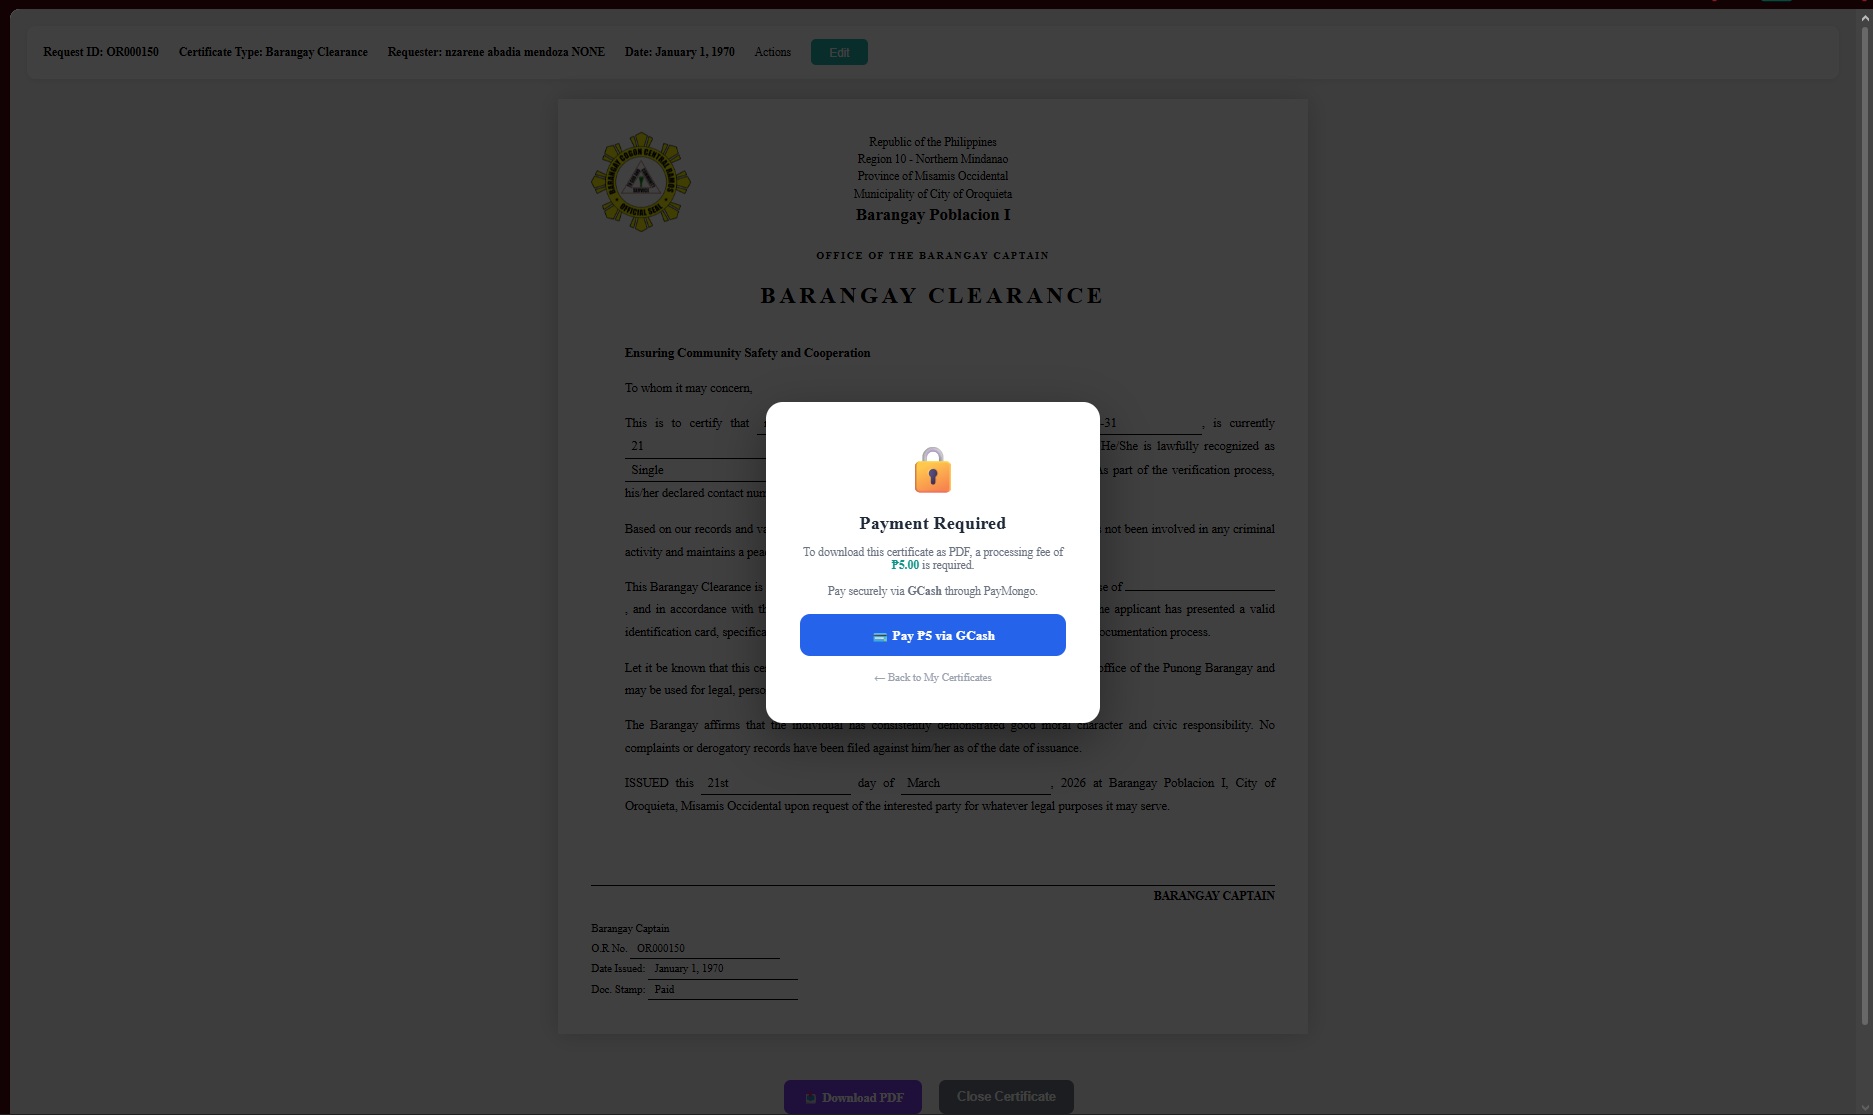
When you click "Download PDF", a Payment Required popup will appear. A small processing fee (e.g., ₱5.00) is required to download the official PDF of your certificate.

Click "Pay via GCash" — You will be redirected to the secure PayMongo payment gateway to complete your payment using GCash.
Complete the payment — After a successful payment, you will be automatically redirected back and your certificate PDF will begin downloading.
Don't want to pay now? — Click "← Back to My Certificates" to return to your certificate list without paying. You can pay anytime later.
The processing fee goes directly to your barangay. This covers the official documentation and issuance cost of your certificate.
My Transactions history Zoom
6
Step 6 of 6 — Transactions
View Your Payment History & Re-download Certificates

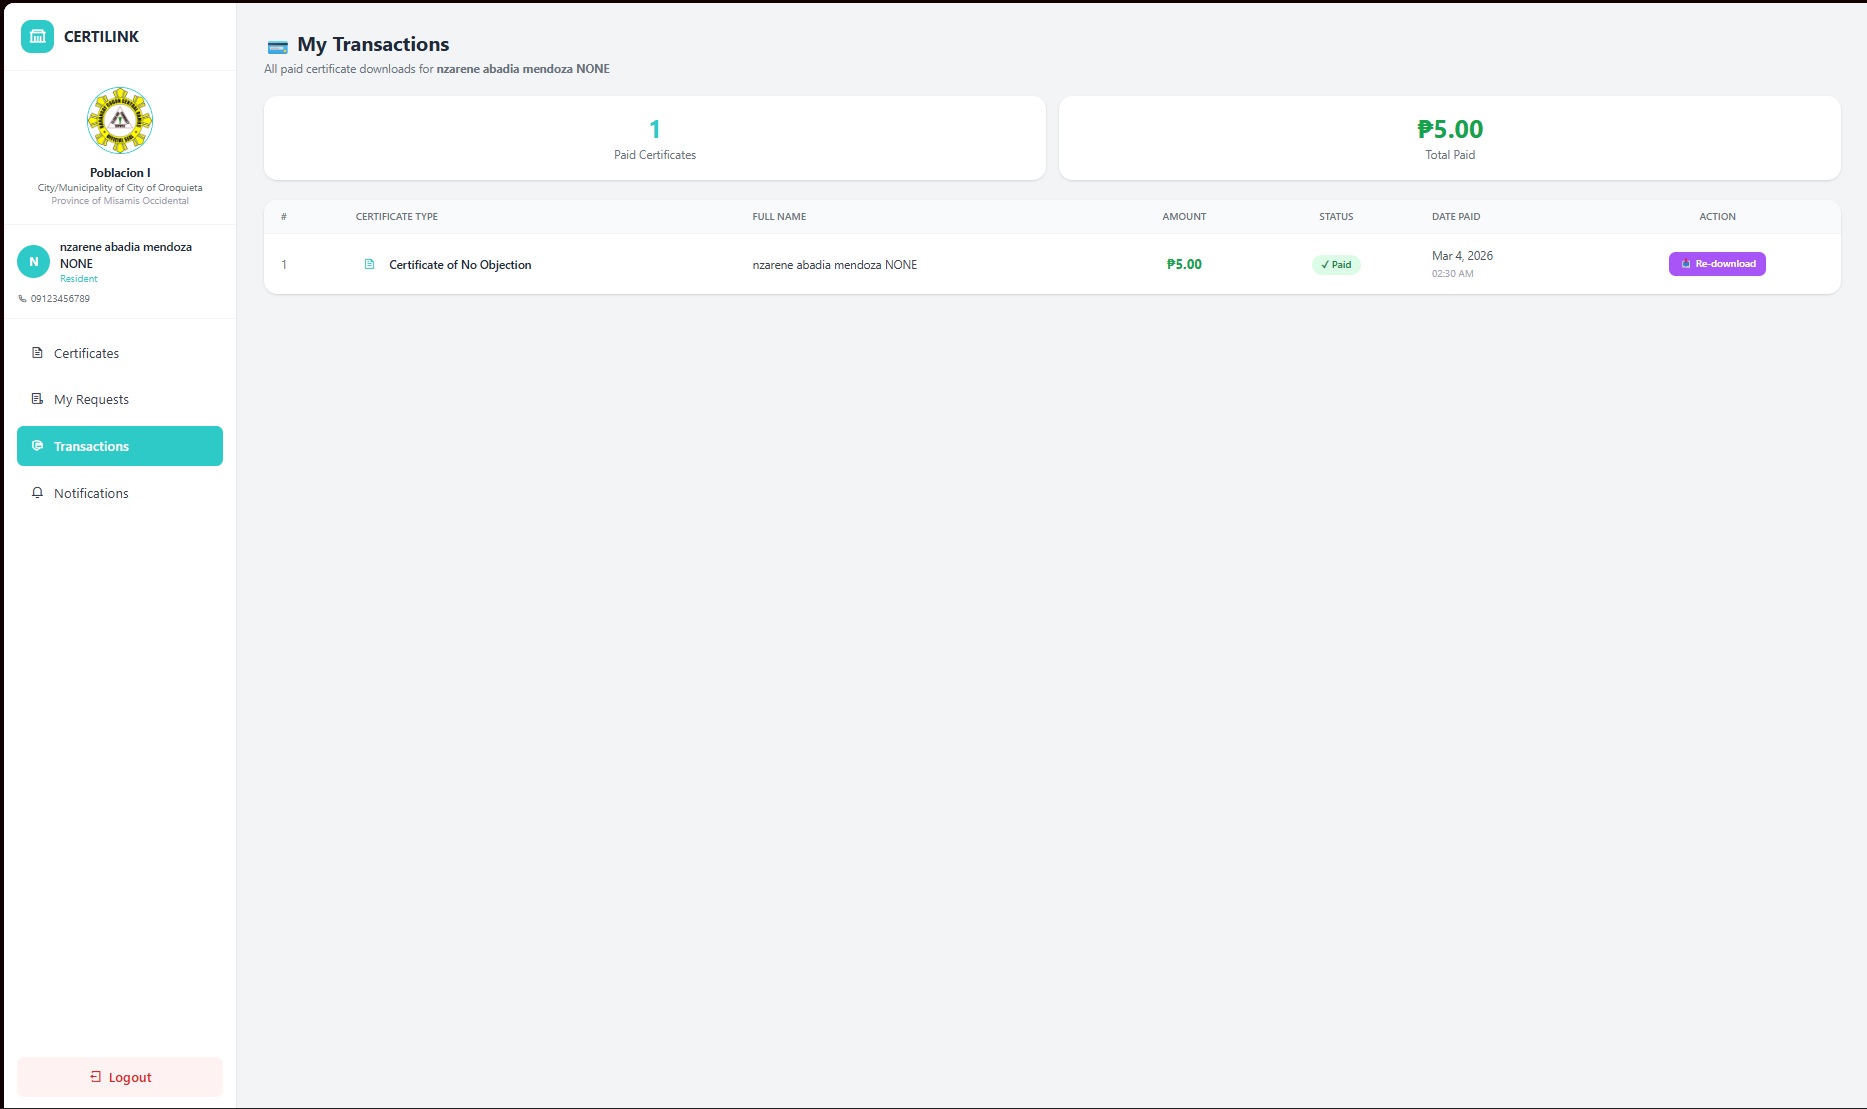
The "Transactions" section in the sidebar keeps a complete record of all certificates you have successfully paid for and downloaded. This is your personal payment history inside CertiLink.

View all paid certificates — See the certificate type, your full name, amount paid, payment status, and the exact date and time of payment.
Re-download anytime — Lost your downloaded certificate? No problem! Click the "Re-download" button next to any paid certificate to get another copy — for free, since you already paid.
Summary cards at the top — See at a glance the total number of paid certificates and the total amount you have paid.
Your transaction records are permanently saved in CertiLink. You can always return to the Transactions page to re-download any certificate you have previously paid for.
🎉

You're All Set!

You now know how to use every feature of CertiLink — from finding your barangay, verifying your identity, registering, logging in, and requesting your certificates. Start requesting now!

 Go Back